Form Fields
Configure custom form fields to collect customer information.
Form Fields let you collect exactly the information you need from customers before checkout. Add up to 10 custom fields with flexible types, labels, and validation.
Form Fields are only available when Axle Form is enabled. When Direct Checkout mode is active, custom fields are not shown.
How to Add Fields
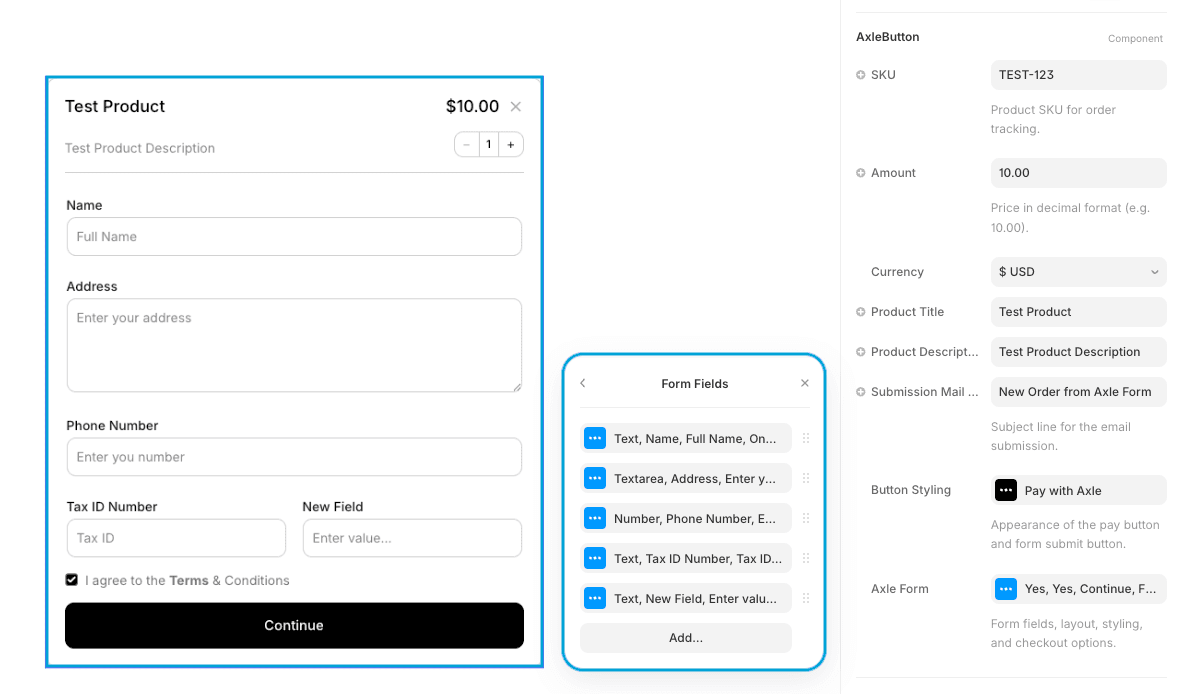
In the AxleButton properties panel:
- Ensure Axle Form is set to Yes
- Open the Axle Form group
- Find Form Fields array
- Click the + button to add a field (up to 10)
- Configure each field's properties
Field Properties
Each field has the following configuration options:
| Property | Type | Default | Description |
|---|---|---|---|
| Type | Enum | Text | Text, Email, Number, Phone, or Textarea |
| Label | String | "New Field" | The label shown above the field |
| Placeholder | String | "Enter value..." | Placeholder text inside the empty field |
| Required | Boolean | true | Whether the customer must fill this field |
| Layout | Enum | One Column | One Column or Two Column placement |
Field Types
Text
General-purpose text field for short responses.
Best for: Names, company names, product color choices, references, coupon codes
Example label: "Your Name" or "Company Name"
Specialized field for email addresses with built-in validation.
Best for: Confirmation emails, contact information
Example label: "Email Address" or "Contact Email"
Email validation happens automatically—customers must enter a valid email format.
Number
Numeric input field for quantities, ages, years, or numerical values.
Best for: Quantities (if not using the Quantity Selector), ages, reference numbers, years
Example label: "Quantity" or "Number of Attendees"
Phone
Specialized field for phone numbers.
Best for: Phone numbers, contact information
Example label: "Phone Number" or "Contact Phone"
Textarea
Multi-line text field for longer responses.
Best for: Addresses, special instructions, messages, feedback, custom requests
Example label: "Shipping Address" or "Special Instructions"
Textarea fields take up more vertical space in the form. Use sparingly.
Field Layout
Control how fields are positioned in the form:
One Column (Default)
Field takes full width. Clean, single-column layout.
┌─────────────────┐
│  Field Label    │
│ ┌─────────────┐ │
│ │ Input field │ │
│ └─────────────┘ │
└─────────────────┘
Two Column
Two fields appear side-by-side on larger screens. On mobile, they stack vertically.
┌──────────────────────────────┐
│  Field 1    │    Field 2    │
│ ┌────────┐  │  ┌──────────┐ │
│ │ Input  │  │  │ Input    │ │
│ └────────┘  │  └──────────┘ │
└──────────────────────────────┘
Use two-column layout for:
- First Name + Last Name
- City + State
- Phone + Email
- Related short fields that benefit from horizontal space
Keep one-column layout for:
- Textarea fields (addresses, messages)
- Email fields that might be longer
- Single isolated fields
Required vs Optional
Toggle the Required switch for each field:
- Required (On) — Customer must fill this field before submitting. An asterisk (*) appears next to the label.
- Optional (Off) — Customer can leave this field blank and still submit the form.
Mark only truly essential fields as required. Too many required fields increases form abandonment.
Best Practices
-
Minimize Fields — Only ask for information you actually need. Each field adds friction.
-
Clear, Concise Labels — Be specific:
- Good: "Shipping Address", "Phone Number", "Company Name"
- Avoid: "Address", "Phone", "Name" (too vague)
-
Helpful Placeholders — Guide customers on what to enter:
- Good: "[email protected]", "(555) 123-4567", "123 Main St, Suite 200"
- Avoid: "Enter text", "Input field", "Type here"
-
Logical Order — Arrange fields in the order customers expect:
- Top to bottom: Name → Email → Phone → Address
- Group related fields together
-
Use Right Types — Match the field type to the data:
- Email addresses → Email type (gets validation)
- Phone numbers → Phone type
- Longer text → Textarea
-
Two-Column for Space — Use two-column layout strategically to save vertical space without crowding on desktop
-
Test on Mobile — Two-column layouts stack on mobile, so ensure your form still looks good
Where Field Data Goes
When a customer submits the form:
Axle Dashboard
All form responses are stored and visible in your Axle dashboard with the transaction.
Stripe Metadata
Form field data is also stored in the Stripe checkout session metadata, accessible in your Stripe dashboard.
Email Notifications
If you have email notifications configured, form data is included in the payment confirmation email sent to your customer.
There are NO built-in Name or Email fields. Every field is custom—add exactly what you need. You might want an Email field to ensure customers provide valid email, or a Name field if that's important to you.
Example Configurations
E-commerce Product with Customization
1. Color Choice (Text) — One Column, Required
2. Size (Text) — One Column, Required
3. Special Instructions (Textarea) — One Column, Optional
Service Booking
1. Full Name (Text) — One Column, Required
2. Email (Email) — One Column, Required
3. Phone (Phone) — One Column, Required
4. Preferred Date (Text, e.g., "2026-03-15") — One Column, Required
5. Special Requests (Textarea) — One Column, Optional
Digital Download with Contact
1. Email (Email) — One Column, Required
2. Company Name (Text) — One Column, Optional
3. How did you hear about us? (Text) — One Column, Optional
Multi-item Order
1. Full Name (Text) — One Column, Required
2. Email (Email) — One Column, Required
3. Phone (Phone) — One Column, Required
4. Shipping Address (Textarea) — One Column, Required
5. Billing Address Same as Shipping? (Text, e.g., "Yes/No") — One Column, Optional
Styling
See Form Styling for detailed options to customize how fields appear, including fonts, colors, padding, borders, and focus/error states.
Next Steps
- Form Styling — Customize field appearance
- Quantity Selector — Add quantity selection
- Terms & Conditions — Add terms checkbox
- Form Mode — Learn more about form mode